Rainbow Fruit Cake: The Ultimate Fresh & Vibrant Dessert
If you are looking for a dessert that captures the essence of a sunny afternoon, look no further than the Rainbow Fruit Cake.
Unlike traditional cakes that rely heavily on heavy chocolates or sugary fondants, the Rainbow Fruit Cake is a celebration of nature’s candy. It combines the airy, light texture of a classic vanilla sponge with the bright, tart, and sweet flavors of a full spectrum of fresh fruits.
This is the kind of cake that stops people in their tracks at a garden party, a summer birthday, or a holiday brunch. It’s not just a treat; it’s a centerpiece. In this guide, we’ll walk you through creating a masterpiece that is as delicious as it is Instagrammable.
The Anatomy of a Perfect Fruit Cake
To make a fruit cake that doesn’t get soggy and maintains its “wow” factor, you need to focus on three specific layers:
1. The “Cloud” Sponge
For a fruit-heavy cake, you want a base that is sturdy enough to hold the weight of the fruit but light enough to feel refreshing. A Chiffon or a Genoise sponge is ideal. These cakes use whipped egg whites to create an airy structure that acts like a sponge, soaking up just a hint of the fruit juices without collapsing.
2. The Stabilized Whipped Cream
The “glue” that holds our rainbow together is cream. However, regular whipped cream can deflate or weep after an hour. We use Stabilized Whipped Cream—made by adding a touch of mascarpone cheese or a stabilizer like gelatin/cornstarch. This ensures your cake looks perfect from the first slice to the last.
3. The Fruit Spectrum
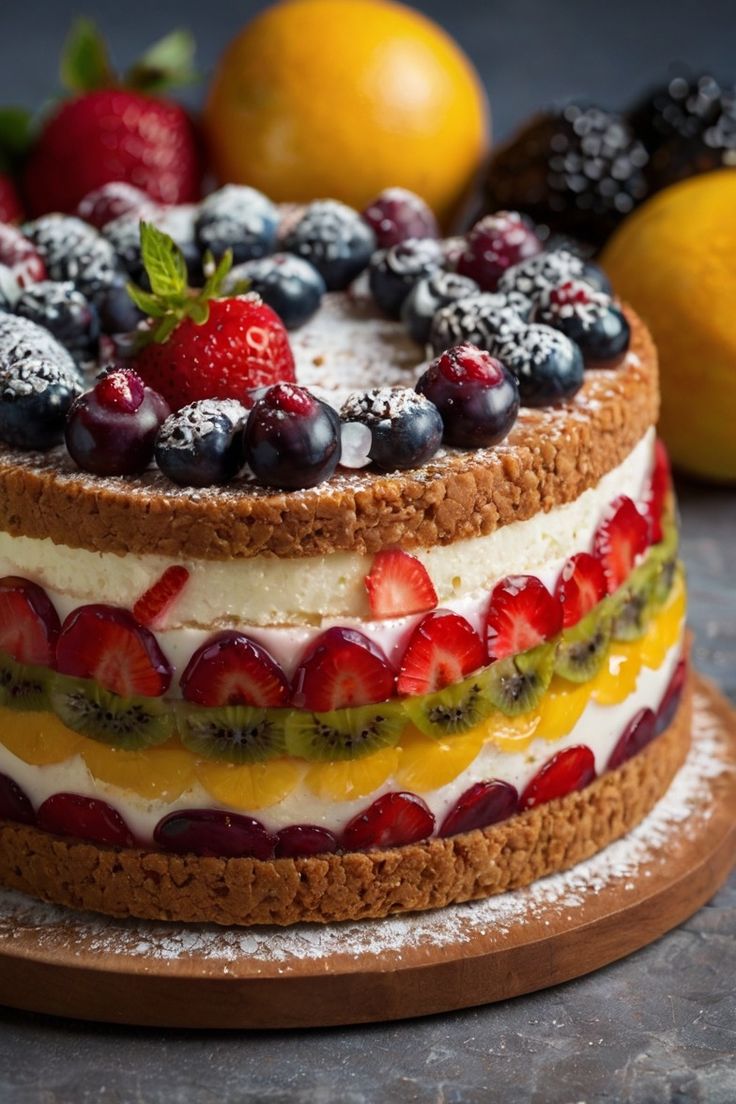
The secret to the “Rainbow” look is the selection and placement of fruit. To get the full effect, you need colors from every part of the visible spectrum:
- Red: Strawberries, raspberries, or pomegranate seeds.
- Orange: Mandarin oranges, mango slices, or papaya.
- Yellow: Pineapple chunks, starfruit, or yellow kiwi.
- Green: Kiwi slices, green grapes, or honeydew melon.
- Blue/Purple: Blueberries, blackberries, or purple grapes.
Pro Tips for Working with Fresh Fruit
- Dry Your Fruit: After washing your fruit, pat it completely dry with paper towels. Excess water is the enemy of whipped cream; it will cause the cream to slide off the cake.
- The Apricot Glaze Trick: Ever wonder how professional fruit tarts look so shiny? Gently heat some apricot jam with a splash of water, strain it, and brush it over the fruit once the cake is assembled. This prevents the fruit from drying out and gives it a stunning “stained-glass” finish.
- Slice Consistently: Use a mandoline or a very sharp knife to ensure your fruit slices (especially kiwi and strawberries) are the same thickness. This makes the “rainbow” look symmetrical and professional.
Recipe: The Rainbow Fruit Fantasy Cake
Prep Time: 45 mins | Cook Time: 30 mins | Serves: 10-12
Ingredients
For the Vanilla Chiffon Sponge:
- 2 ¼ cups Cake Flour (sifted)
- 1 ½ cups Granulated Sugar (divided)
- 1 tbsp Baking Powder
- 1 tsp Salt
- 5 Large Egg Yolks (room temperature)
- ½ cup Vegetable Oil
- ¾ cup Water
- 1 tsp Vanilla Extract
- 8 Large Egg Whites (room temperature)
- ½ tsp Cream of Tartar
For the Stabilized Cream Frosting:
- 3 cups Heavy Whipping Cream (cold)
- ½ cup Powdered Sugar
- 8 oz (225g) Mascarpone Cheese (cold)
- 1 tsp Vanilla Paste (or extract)
The Rainbow Fruit Toppings:
- Red: 1 cup Strawberries (hulled and sliced)
- Orange: 2 Mandarin oranges (peeled and segmented)
- Yellow: 1 cup Fresh mango (diced)
- Green: 2 Kiwis (peeled and sliced into rounds)
- Blue/Purple: ½ cup Blueberries and ½ cup Blackberries
Instructions
Step 1: Bake the Sponge
- Preheat & Prep: Preheat your oven to 325°F (160°C). Do not grease your cake pans (chiffon cake needs to “climb” the walls of the pan to rise).
- Mix Dry & Yolks: In a large bowl, whisk the flour, 1 cup of sugar, baking powder, and salt. Make a well in the center and add egg yolks, oil, water, and vanilla. Whisk until smooth.
- Whip the Whites: In a separate clean bowl, beat the egg whites and cream of tartar until foamy. Gradually add the remaining ½ cup of sugar while beating until stiff, glossy peaks form.
- Fold: Gently fold the egg whites into the yolk mixture in three additions using a spatula. Do not stir—you want to keep the air in!
- Bake: Pour into two 9-inch round pans. Bake for 30–35 minutes.
- Cool Upside Down: This is crucial for chiffon! Invert the pans onto a wire rack and let them cool completely while upside down to prevent the cake from shrinking.
Step 2: Prepare the Frosting
- In a chilled bowl, beat the mascarpone, powdered sugar, and vanilla until smooth.
- Slowly pour in the heavy cream while continuing to beat on medium-high speed.
- Whip until the mixture holds stiff peaks. Be careful not to over-beat, or it will turn into butter!
Step 3: Assembly
- Layering: Place the first cake layer on a plate. Spread a thick layer of cream. Scatter some diced fruit (like mango or strawberries) into the cream.
- Top Layer: Place the second cake layer on top. Cover the entire top and sides of the cake with the remaining whipped cream. Use an offset spatula to create a smooth, clean surface.
Step 4: Creating the Rainbow
- The Pattern: Starting from the outer edge of the top of the cake, arrange the strawberries in a neat circle.
- Work Inward: Create the next concentric circle using mandarin segments, followed by mango, then kiwi.
- The Center: Fill the very center of the cake with a cluster of blueberries and blackberries.
- Side Decor (Optional): You can press extra kiwi slices or halved blueberries into the sides of the cake for more color.
How to Serve and Store
- Chill Before Serving: Let the cake sit in the fridge for at least 2 hours before slicing. This helps the cream set and the flavors meld.
- Slicing: Use a long, serrated knife and wipe it clean between every slice to keep the white cream looking pristine against the colorful fruit.
- Storage: Because of the fresh fruit and cream, this cake must be kept in the fridge. It is best eaten within 24–48 hours. After that, the fruit may begin to release juices.
Final Thoughts
The Rainbow Fruit Cake is proof that you don’t need artificial dyes to create something colorful and exciting. It’s a breathable, light, and healthy-ish way to indulge your sweet tooth. Whether it’s the middle of July or the dead of winter, this cake brings a bit of sunshine to the table.